Thursday, May 23, 2019

Being a Digital Citizen

What is a Digital Citizen?
A digital citizen refers to a person who has the knowledge and skills to effectively use digital technologies to communicate with others, participate in society and create and consume digital content. 
Digital citizenship is about confident and positive engagement with digital technologies. By educating students about digital citizenship, they will have the opportunity to develop an understanding about the following concepts: 

  1. Digital and information literacy
  2. Internet safety
  3. Privacy and security 
  4. Cyber bullying, relationships, etiquette and communication
  5. Creative credit and copyright
  6. Digital footprint
There are around 9 elements of a digital citizenship;
  1. Digital Etiquette: Refers to the conduct one uses when interacting with others online. 
  2. Digital Access: Technology users need to be aware that not everyone has the same opportunities when it comes to technology. Working toward equal digital rights and supporting electronic access is the starting point of Digital citizenship.
  3. Digital Law: Copyright/Plagiarism Students need to realize how important it is to ensure they are producing work that is in their own words, and to be sure to give credit to those they are sourcing from.
  4. Digital Communication: How do new communication methods like texting, cell phones, and social networking (twitter, Skype, etc.) fit in an educational classroom setting? What kind of positive outcomes might they enable? makes learning a lot of interesting and interactive.
  5. Digital Literacy: Digital Literacy is the capability to use technology and knowing when and how to use it, and can be broken down into three sections.
  6. Digital Commerce: “Learning to become an intelligent consumer is an important aspect of good citizenship. Unfortunately, it is not uncommon for students to go online and purchase items without thinking about the consequence. therefore it is the teacher's and the parent's responsibility to guide the students.
  7. Digital Rights and responsibilities: Students need to follow and use technology responsibility inside and outside school. They should be informed of all the consequences that follows if they ever violet the rights and responsibilities.
  8. Digital Safety and security: With the amount of personal information we as a society are putting online through social media sites, banking and online services, it’s important we are all aware of how to best protect this information from being accessed.
  9. Digital health and wellness:Physical and psychological well being. Finding balance between on and offscreen time. Protect eyes and ears, posture, proper way to use keyboard. Looking at addictions Computer Ergonomics for Elementary Schools Digital Health & Wellness Visit Common Sense Media’s scope and sequence for lessons specific to the students you are teaching.
Being a digitally active tutor we need to be vigilant and make sure that all the students follow these elements of a digital citizenship. They have to know all the consequences that follows if they ever violet any of the elements. It is not enough to create rules,and policy. we must teach everyone to become responsible digital citizens in this new society.
You all can more about digital citizenship by clicking the following links.

Monday, May 20, 2019

Camtesia tutorial


Camtasia
Camtasia Studio is a nifty piece of video software for PC and Mac users that allows to record on-screen activity, edit/modify content and then share the video on various platforms. Camtasia provides educators with the perfect solution to easily create videos that motivate students, inform parents and enhance learning. Camtasia screen recording software is feature perfect, smart, and quick to learn tool.
Reasons to use Camtasia:
1.      User-friendly
2.      Easy to share
3.      Beneficial features
4.      Perfect for informative videos
5.      Professional look

Steps to create a video in Camtasia:
Step 1. Start with a plan
If you want to learn how to make tutorial videos or other instructional videos it all begins with with great planning.
Start by spending some time getting to know your audience. Learn how they use your product and find out where they struggle. Then use that information to choose a tutorial topic that will best help your target group.
Once you have your topic, create a storyboard to outline and visualize what you plan to show in your video.
Step 2. Write a script
Here are a few tips to help you write a script.
Use words you’d use in everyday conversations. This will give your script a smooth, natural feel.
Don't just tell viewers what’s going on, show them. Instead of simply saying what's happening on-screen, let those actions speak for themselves and use this time to add context with the voice over or narration.
Practice, practice… and then practice again. Read your script aloud and see how it flows. If you find yourself getting tripped up, go back and make sure you’re using natural language.
Finally, get some feedback. Find someone who’s not afraid to tell you what they really think and send them your script. This might seem scary at first, but once you get used to receiving feedback, it becomes an essential part of the scripting process.


Step 3. Record the audio narration
The Camtasia video editor makes it simple to record your voice over with built-in voice narration.
When you’re ready, record the script and make sure to speak slowly and clearly. If you make a mistake, don’t start over. Simply pause and start again right before you made the mistake. You can always remove mistakes when you’re finished.


Step 4. Record video of your screen
The next step is recording your screen video. Start by cleaning up your desktop, closing any applications you don’t need, and turning off any notifications that might pop up.
Open the application you want to record and walk through exactly what you want to show your viewers. This will help you get those smooth cursor motions and, in the end, you’ll have less editing to do. When you’re ready, open the Camtasia recorder and record your screen.
Remember, if you make a mistake, simply pause... and then start right before the mistake. You can always edit it out in the end. You’ll want to make sure the screen recording software you use has built-in video editing.
Step 5. Cut out mistakes and trim extra footage
When you’re finished recording your screen, it’s time to get all hack and slash with editing. 
To start, cut out mistakes and trim extra footage from the ends of your recording. When finished, bring in your audio narration and any other media needed for the project.
0:13


Step 6. Sync your audio and video
With your audio narration on the timeline, use clip speed and extend frame to sync the pace of your video with your narration. 
For example, if you need more time to explain a concept, split the clip and use extend frame to freeze the video. Or if you want to speed up a boring part of your recording, add clip speed, then drag the handles to speed it up.
0:10


Step 7. Produce and share the video
The last step in creating a tutorial is to save the video. Think about where you want this video to live and choose a share destination.
As an extra last step, we recommend sharing your video with a few people to get feedback. This is a great way to make sure your message is clear, and your video is accomplishing your goals


Wednesday, May 8, 2019

HOW TO CREATE A CLASS IN GOOGLE CLASSROOM


Google Classroom enables us as teachers to create an online classroom area in which we can manage all the documents that our students need. We can make assignments from within the class, which our students complete and turn in to be graded.
To create the google classroom you need to follow these steps:
1. Open a Web browser and go to classroom.google.com. You have to sign in with your Google Apps for Education account.
2   2. On the Welcome screen, click the plus sign at the top and choose Create Class.
3   3.  In the Create a Class dialogue box, type in the Class Name and Section.
4   4. Click Create.
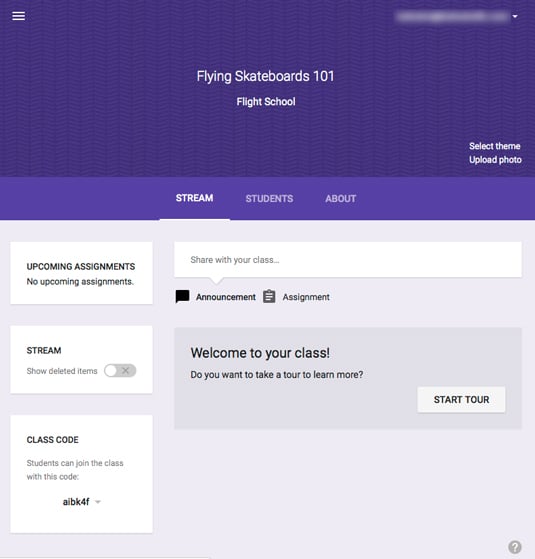
Your new classroom is created. You can see that the classroom has three main tabs. Here’s what those tabs mean:
  • Stream: This is where we manage our class assignments and make announcements to the class. We can add new assignments, with due dates and attached materials. Upcoming assignments are shown at the left. Also, just with social media services, we can send message to our entire class — even with an attachment.
  • Students: This is where we manage our students. We can invite students to our classroom from here and manage their permissions level. To invite students to our class, we have to set them up as Google Contacts in your Google Apps for Education account or they have to be in the school’s directory.
  • About: This is where we can add the course title and description, add a location for the class, and add materials to your class’s Google Drive folder.

Figure 1: Your new classroom.


TIP: You can take a tour of all of the features to find out how to use Google Classroom. Just click the Start Tour button on the Stream tab.
REMEMBER: After you create at least one class, you no longer see the Welcome screen when you log in. Instead, you see the Home screen. This screen shows all of your classes arranged in tiles. Just click on a class name to access it. Here are a few other features of the Home screen:
  • Add a new class: Just like on the Welcome screen, we can add a new class by clicking the plus sign in the top left next to your username.
  • Rename or archive a class: Click the three stacked dots next to the class name to either rename the class or archive it. Archiving a class means that, though we and our students can still access the class, no one can add assignments or make any other changes to the class. The class will move under the Archived section of the Home menu. There is nothing to worry, though; we can restore the archived class at any time by viewing Archived classes, clicking the three stacked dots, and choosing Restore.
  • Access Google Drive for the class: Click the file folder icon in the bottom right corner of the class tile. This opens the Google Drive where all our classroom materials are stored.