Google Classroom enables
us as teachers to create an online classroom area in which we can manage all
the documents that our students need. We can make assignments from within
the class, which our students complete and turn in to be graded.
To create the google classroom you need to follow these steps:
1. Open a Web browser and go to classroom.google.com. You have to sign in with your Google Apps for Education account.
1. Open a Web browser and go to classroom.google.com. You have to sign in with your Google Apps for Education account.
2 2. On the Welcome screen,
click the plus sign at the top and choose Create Class.
3 3. In the Create a Class
dialogue box, type in the Class Name and Section.
4 4. Click Create.
Your new classroom is
created. You can see that the classroom has three main tabs.
Here’s what those tabs mean:
- Stream: This is where we manage our class assignments and make announcements to the class. We can add new assignments, with due dates and attached materials. Upcoming assignments are shown at the left. Also, just with social media services, we can send message to our entire class — even with an attachment.
- Students: This is where we manage our students. We can
invite students to our classroom from here and manage their permissions
level. To invite students to our class, we have to set them up as Google
Contacts in your Google Apps for Education account or they have to be in
the school’s directory.
- About: This is where we can add the course title and description, add a location for the class, and add materials to your class’s Google Drive folder.
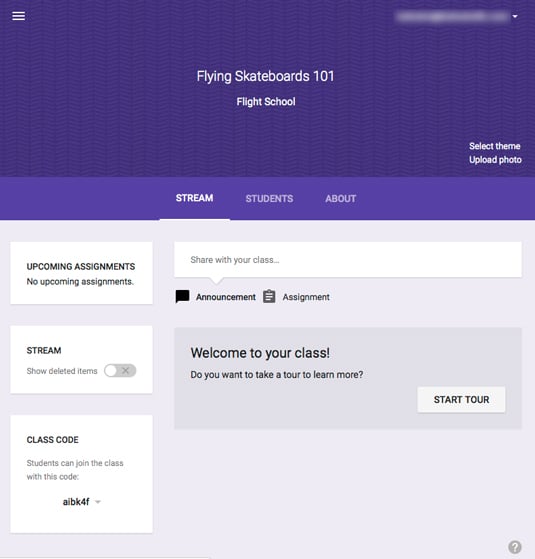
TIP: You can take a tour of
all of the features to find out how to use Google Classroom. Just click the
Start Tour button on the Stream tab.
REMEMBER: After you create at
least one class, you no longer see the Welcome screen when you log in. Instead,
you see the Home screen. This screen shows all of your
classes arranged in tiles. Just click on a class name to access it. Here are a
few other features of the Home screen:
- Add a new class: Just like on the Welcome screen, we can add a
new class by clicking the plus sign in the top left next to your username.
- Rename or archive a class: Click the three stacked
dots next to the class name to either rename the class or archive it.
Archiving a class means that, though we and our students can still
access the class, no one can add assignments or make any other changes to
the class. The class will move under the Archived section of the Home menu. There is nothing to worry, though; we can restore the archived class at any time by
viewing Archived classes, clicking the three stacked dots, and choosing
Restore.
- Access Google Drive for the class: Click the file folder
icon in the bottom right corner of the class tile. This opens the Google
Drive where all our classroom materials are stored.

Hi author! Its always worth going through your blog. You clearly mentioned all the steps on how to create google classroom and I think it will be helpful for those who are unaware on how to create google classroom.
ReplyDeleteWorth reading your reflection and i think it was good idea to give steps on how to use google classroom since people who reads your blog will gain some ideas.
ReplyDeleteI liked your idea of providing the steps to use the google classroom attached with self made video. More than mere provision of information, if you could write some refection while learning this topic in ICT class.
ReplyDeleteInformative information are reflected which are very important. The written piece is easy to understand and gives a lots of tips to create google classroom. Worth reading. Cheers
ReplyDeleteWorth reading your reflection and i think it was good idea to give steps on how to use google classroom since people who reads your blog will gain some ideas.
ReplyDeletegood job
It's great of reading your reflection, because going through your reflection it's seem that you have really understand about Google classroom and the readers of your post will understand too.
ReplyDelete